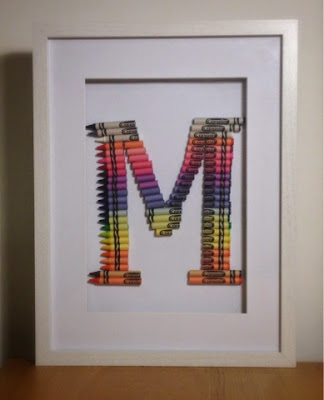
| John Lewis - £60 |
I am sure everybody has seen these around, I think the are fantastic, vibrant, colourful and great for a craft room or kids room!! BUT. . . at £60 from John Lewis, The Letterooms Crayon M framed 3D artwork is a little too pricey, so I thought I would try making my own.
Don't you just love it when people ask where things are from and you can say very proudly ... I made it!!
Well here it is, I made this!! Keep reading for my DIY tutorial for a Crayon M for under £20!!
 |
| All Hans-on DIY - £16.90 |
For this project you will need:
- 3 packs of Crayola Wax Crayons from Asda- 97p each
- A4 Box Frame from Matalan (30cm X 35cm) - £5
- Glue gun from Tiger - £4
- Craft knife from Hobbycraft - £5
- Card
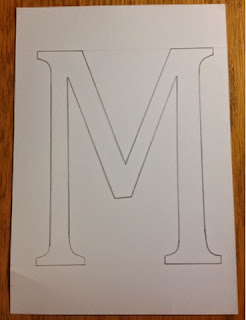
- Template of your letter
WARNING! This is a very time consuming project.
To start, trace around the template of your desired letter onto the card and put it in the frame to check it is the right size. You will also need to decide your colour order and layout. I went for the rainbow effect, the colourlovers website was really useful as it lists the crayons by name in colour order. For the layout I choose to have all the crayons facing the same way but you could alternate or have any pattern you wish - be as creative as you like!

Once you have settled on colours and the layout you can start cutting your crayons. Measure them before to ensure consistency and symmetry however, as you can see from my final product it isn't as easy as it looks so take your time with this part.
For the base of the 'M' I decided to have four longer crayons as I used a serif font for my template, this means that it has lines at the end of the character. To make it easy I cut between the l and the a of the word Crayola, this helped to keep them all the same size. The easiest way to cut the crayons is to score all the way around with the craft knife and then snap the crayon in half, this gives a clean break.
I bought 3 packs of crayons to ensure I had enough to practice and to create the final design. I also found that some were already snapped before I opened the packet and you may not want to use all the colours so extras are definitely worth it and at 97p a packet it really isn't an issue. I had about 24 left over and lots of cut ends but please bare in mind that you might need more or less depending on your letter and font size.
Now align the crayons to check that they cover the template and you are happy with the design.
Once you are happy, its glueing time! I used a glue gun but any decent craft glue that will hold the weight of the crayons would work fine. The only down slide to using the glue gun is that it dries instantly so there is no room for error, hence the top of the M is a little wonky! I think it adds to the home-made look though!
One at a time glue each crayon to the card, take your time to ensure they are lined up and the writing is facing the same way as once it is stuck with a glue gun - it is stuck!
I then glued this to the back piece of the picture frame to hold it in place.
And now you can say "I made that!"
You can also buy crayola packs in just pinks or blues which I think would be a great addition to a newborns room!
Have you tried this project or other projects using crayons?
Mel xoxo


I love this and you're right, you are very creative! I might have a go myself, Leanne (Serendipity, History and Me / @DipityMe )
ReplyDelete